AN023 - Application update procedure with MMC on A1-HMI-QC104
| Document: | AN023 | ||
|---|---|---|---|
| Description: | Application update procedure with MMC on A1-HMI-QC104 | ||
| Editor: | Riccardo Furlato | ||
| Approver | Gabriele Bazzi | ||
| Link: | http://www.qem.eu/doku/doku.php/appnote/an023 | ||
| Language: | English | ||
| Document Release | Description | Note | Date |
| 01 | New manual | Valid from hardware release 03, and firmware release QC104-xx.5.1 | 11/02/2015 |
Premise
Before execute the application update from MMC there are some premises to be respected:
-
The MMC must be formatted with a filesystem type FAT12, FAT16 or FAT32;
-
Before copying files to the MMC we recommended to execute the formatting.
-
The file should be named as:
appqtp.bin
Procedure
-
Turn off the instrument.
-
Insert the MMC/SD as shown on the serigraphy in the picture (The MMC remains protruding).

-
Press the
BOOTkey for 3 seconds, or press both the
 F2 +
+ F4 +
+ F6 keys to access the Setup.
 -
The following page is showed
SETUP:
-
Press
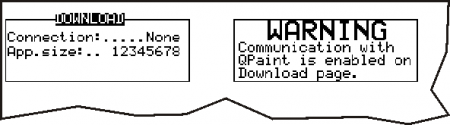
esc in the virtual keyboard
  for exit to the
 DOWNLOADpage
-
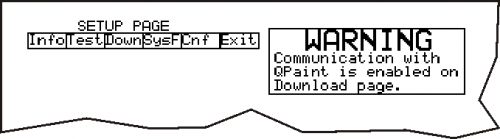
Select
SysFfrom the menu using the arrows
 of the virtual keyboard, then press the
 Enterkey .
.
-
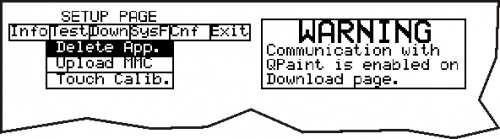
Select
Upload MMCfrom the menu using the arrows
 of the virtual keyboard, then press the
 Enterkey for show the System Functions.
-
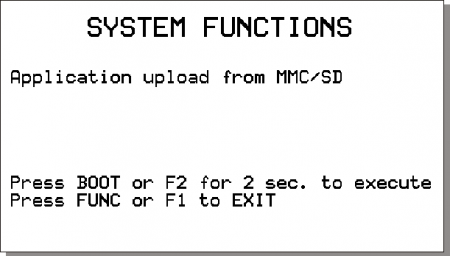
Pressing the
BOOTkey or F2key for per 2 seconds, the selected function to be executed.
The POW led starts flashing to indicate that the selected function is running.
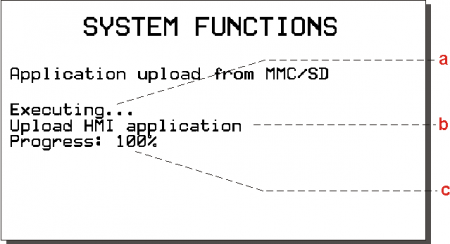
* a = indicates that the system function is running.
* b = running operation.
* c = percentage of the performed function.
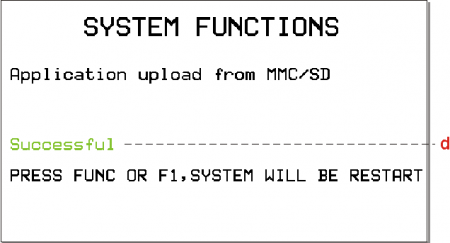
* d = Indicates that the function was successful execute. -
By pressing theFUNC ot the
F1key the instrument restarts.
If the execution of the function is not successful turns off the POW LED and starts flashing the ERR led.
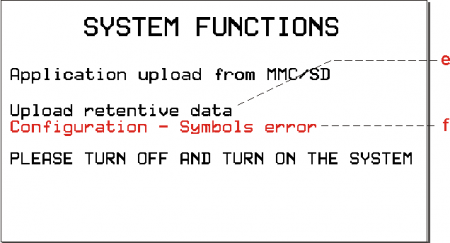
* e = the operation that caused the error.
* f = indicates the type of error that occurred.


In this case, repeat the procedure carefully from the beginning and if necessary, contact the Assistance.